

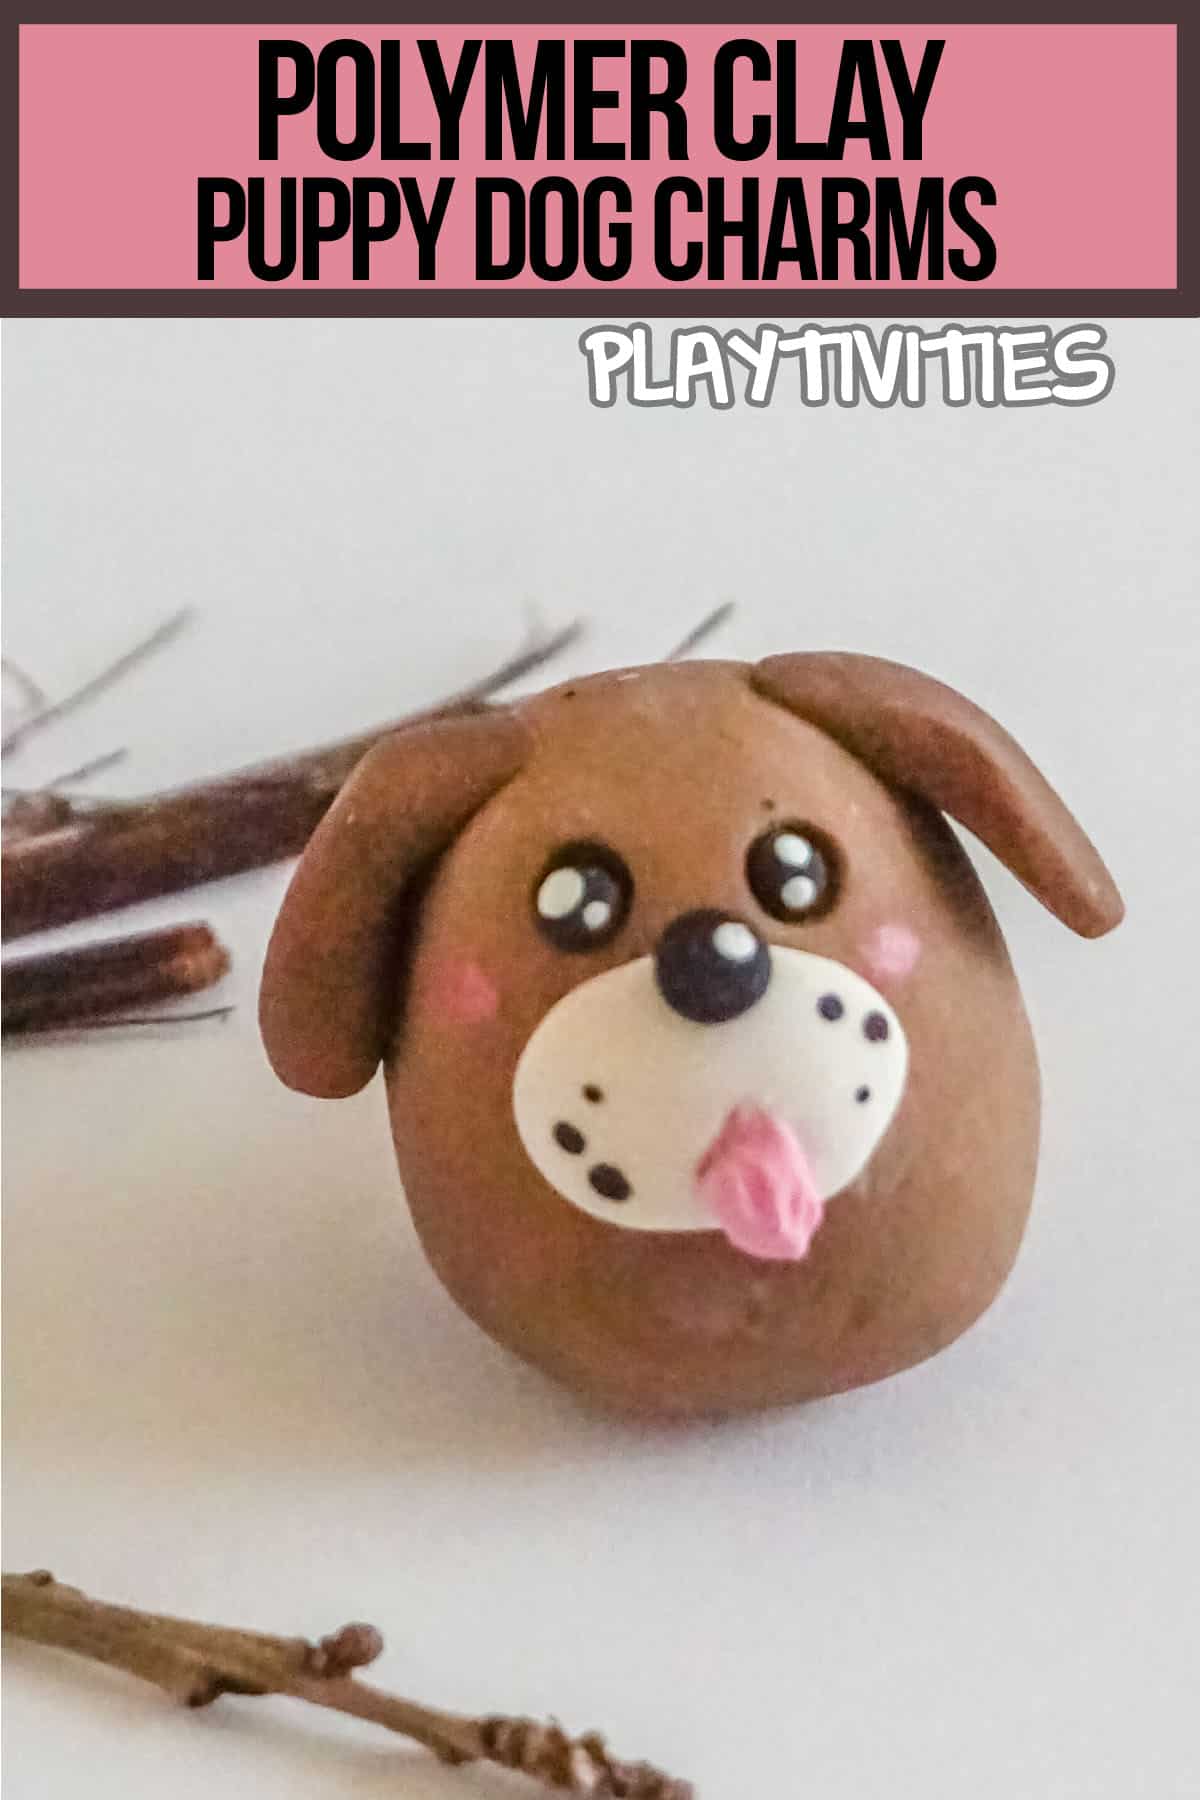
Does your tween or teen just loves dogs? If so, this Polymer Clay Puppy Kids Craft is perfect for them! This easy craft only takes a few minutes to make, and your child will love giving their new puppy a home. They make a great necklace or bracelet charm - or just a fun addition to a desk!

Polymer Clay Puppy Kids Craft
What Is Polymer Clay?
Polymer clay is a type of modeling clay that is made from polymers. It is available in a variety of colors and can be easily molded into different shapes. Polymer clay is oven-bakeable, and once it is baked, it will harden and become durable.
Why Use Oven-Bake Clay Instead of Air-Dry Clay?
When you use oven-bake clay, the clay will harden and become durable. Air-dry clay will not harden, and it can break easily. Additionally, it will take ages (like 24-48 hours) for the air-dry clay to fully cure. Where it will only take about 30 minutes in the oven for the polymer clay to cure. So, it makes for a much more quick turn-around.
Do You Need Any Special Tools to Make this Clay Craft?
Nope! All you need is some oven-bake clay, a toothpick, and an oven. That's it! Oh, and if you want to turn this into a necklace or bracelet charm, you'll need a jump ring and chain (or string).
Will You Need to Seal Your Polymer Clay Charm?
No, you don't need to seal it. But, if you want to, you can. I like to use a clear sealer just for some extra protection. Plus, it gives the charm a nice shine. Just take care to use a sealant that is specifically made for polymer clay. The last thing you want is to have spent a ton of time working on this cute polymer clay puppy and then the sealant is sticky, lifts color or cracks the surface.
WHAT SUPPLIES DO YOU NEED TO MAKE THIS EASY POLYMER CLAY KITTY CRAFT?
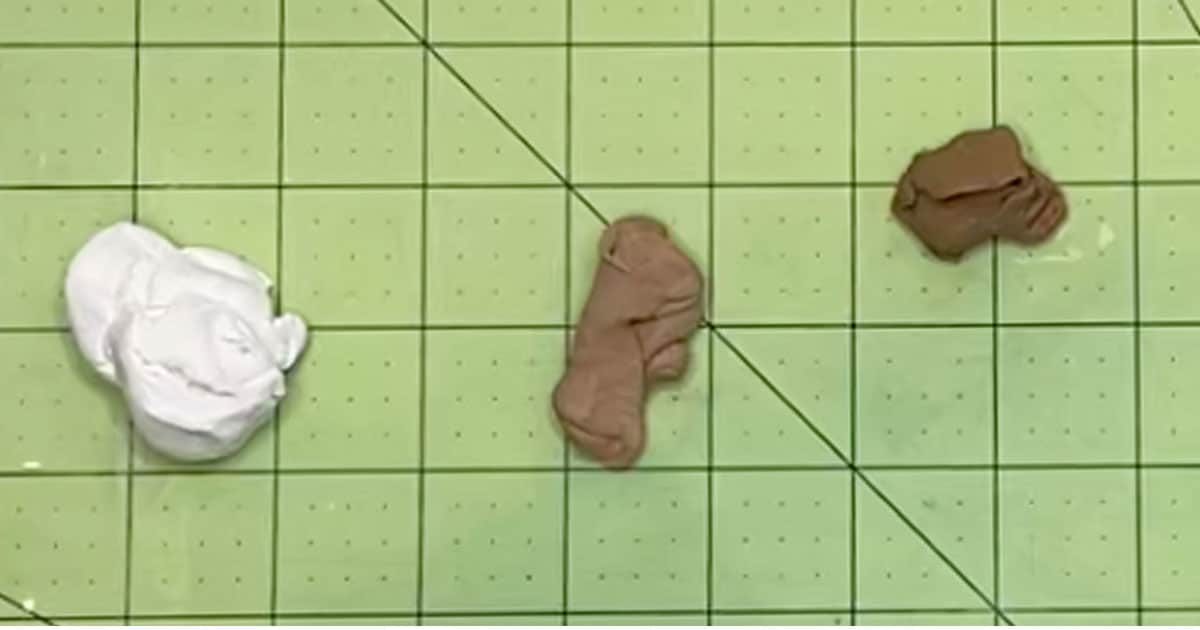
- White Polymer Clay
- Light Brown Polymer Clay
- Dark Brown Polymer Clay
- Pink Polymer Clay
- Black Polymer Clay
- White Acrylic Paint
- Pink Acrylic Paint
- Rubbing Alcohol
WHAT TOOLS DO YOU NEED TO MAKE THIS EASY POLYMER CLAY DOG CRAFT?
- Chopstick or ⅛-inch Dowel
- Oven
- Parchment Paper
- Baking Sheet
- Toothpick
- Paintbrush
HOW DO YOU MAKE THIS EASY POLYMER CLAY PUPPY DOG CRAFT?
Preheat your oven to the temperature noted on your clay packaging. For my clay the baking temperature is 230-degrees F.
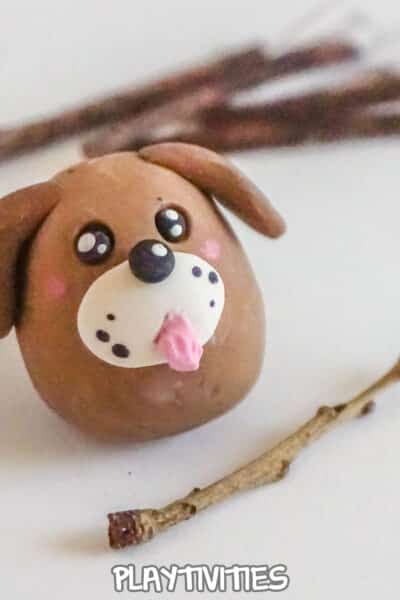
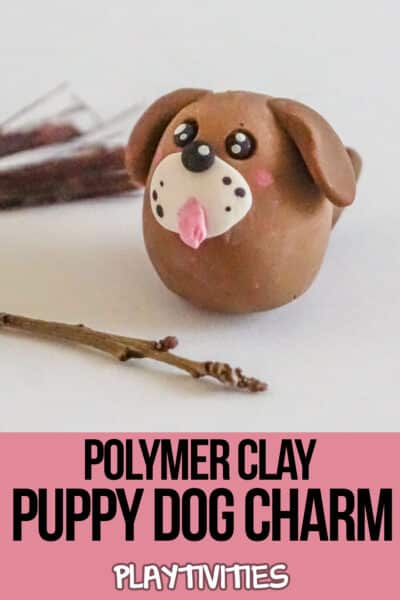
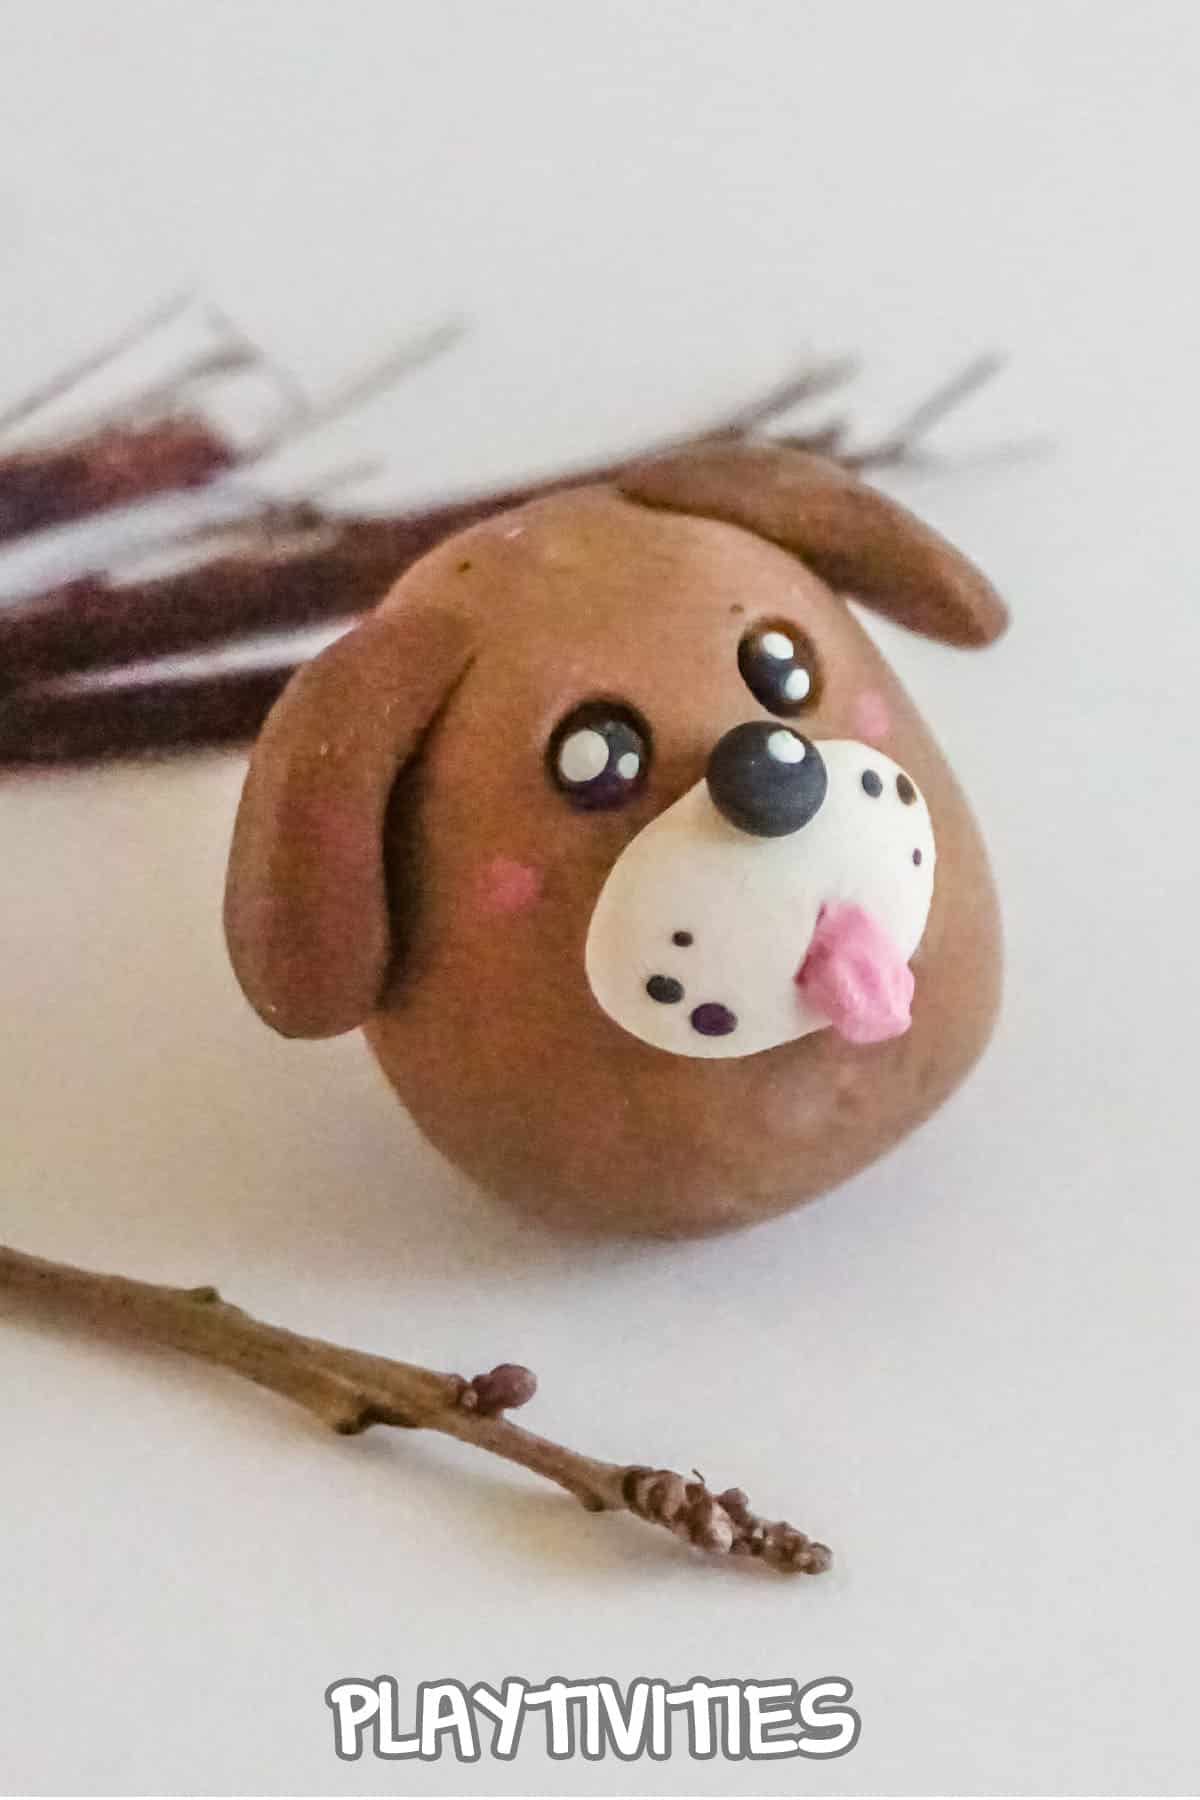
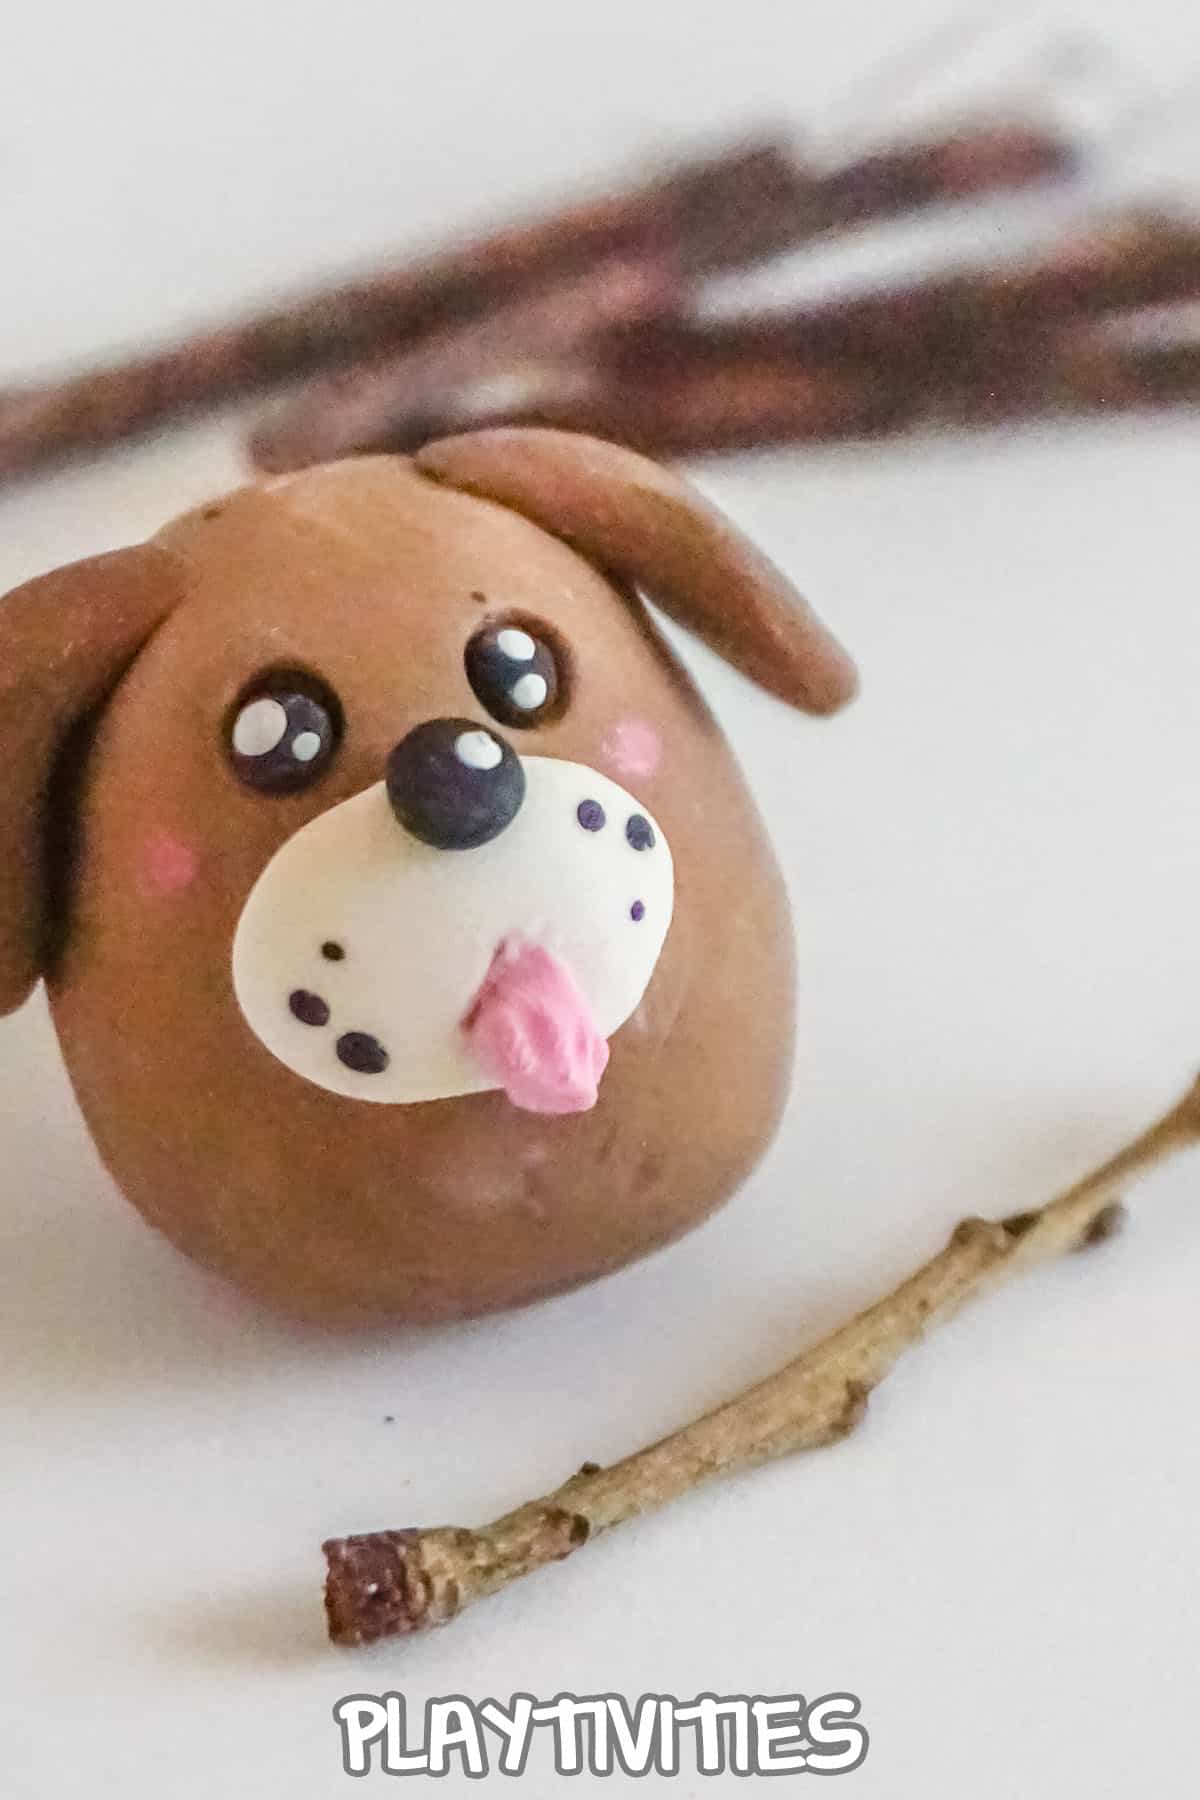
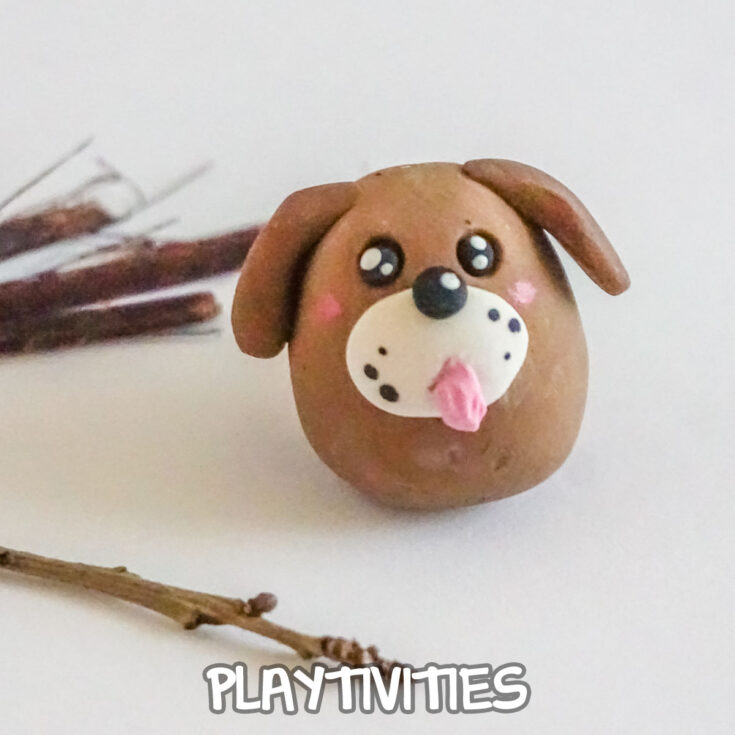
To make the body of the dog, break off a small portion (about 1 inch square) of the light brown clay.
Roll this light brown clay into a nice, neat ball that is very smooth, then roll and shape the top (your choice of which end is the top) into a bit of a wide-domed cone. This should be as rounded and smooth as you can get it.
Mash the other end of the light brown clay into a flat bottom.
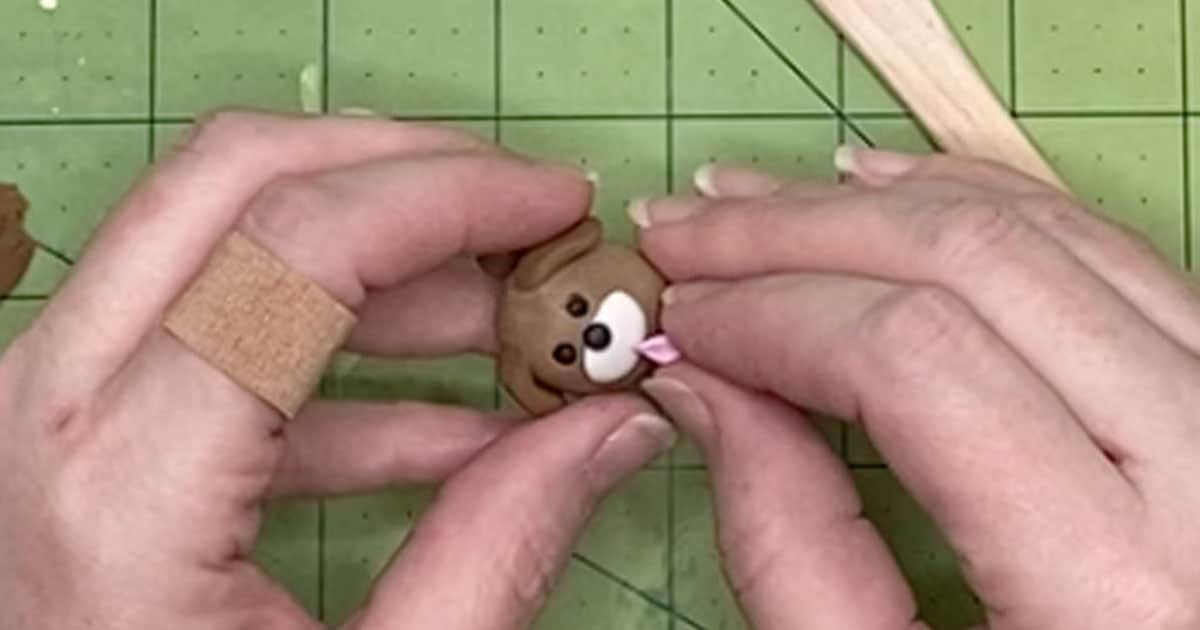
Make the tail by pinching off one small piece of the dark brown clay (about 1/4-inch long by 1/8-inch wide) then rolling it into a fat, short snake. Taper the snake on one end to a point and flatten the other end. Affix the flat end of the tail to the back bottom of the body piece of clay. To help the edge of the tail to affix to the body, you can use a paintbrush to work the edge of the tail into the body. Give the tail a little curl, as desired.
Make the ears by pinching off two very small pieces of the dark brown clay (about ¼-inch long by ⅛-inch wide each). Flatten and shape each of these into small floppy ears and affix them to either side of the top of the body piece of clay. To help the edges affix, you can use a paintbrush to work the edge of the ears into the body.
Make the muzzle by pinching off a piece of white clay (about 1/8-inch square) and shaping it into a wide, flat oval shape. Press it to the front of the body piece, about 1/3 of the way down from the top of the head.
Make the nose by pinching off a piece of black clay (about 1/16-inch square) and make it into a nice, neat ball. Press this onto the front of the dog, at the top of the muzzle.
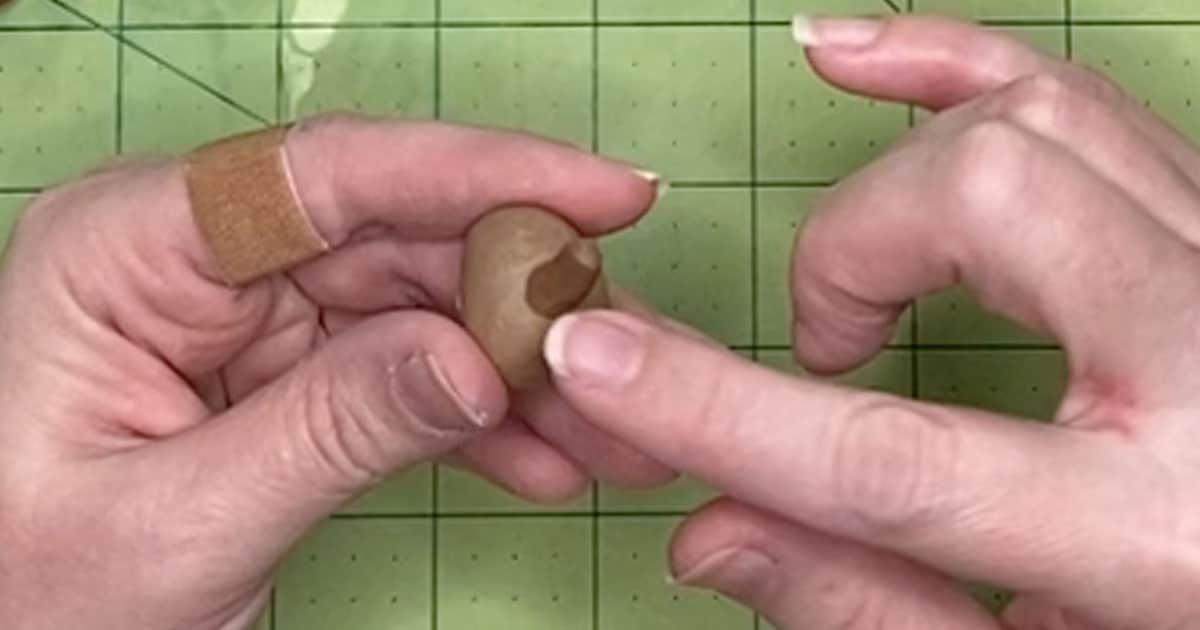
Add eye sockets by pressing the end of a chopstick twice into the space between the nose and ear, leaving a shallow crater where the eyes will go.
Add the eyes by pinching off the tiniest piece of black clay (about 1/16-inch square) and rolling it into a tight, neat ball. Repeat to make two balls, then press them into the craters you made in the last step.
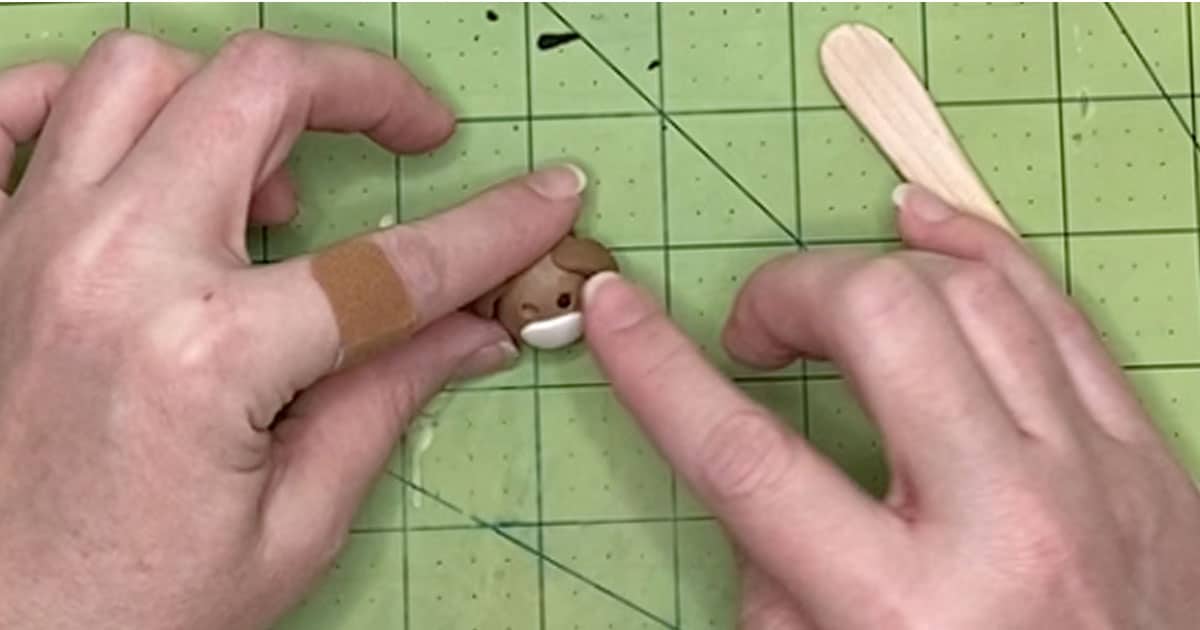
Finally, pinch off the tiniest piece of pink clay (about 1/16-inch square) and rolling it into a tight, neat ball. Then flatten it into a flat oval. Fold this in half and affix it to the bottom of the muzzle.
Clean your fingerprints and tiny imperfections from your puppy dog by gently brushing the clay with a paintbrush dampened in rubbing alcohol. This does not have to be super wet with the alcohol, just a little goes a long way. Take care to brush the white parts first, followed by the darker colors so that no brown clay smears on your white clay.
Bake the clay dog per the instructions on your clay packaging. Allow to cool completely before handling.
Using the end of a toothpick, place the smallest dot of white paint on the black part of the eyes.
With the clean end of the toothpick, place the smallest dots of black paint on the muzzle for faux whiskers.
Allow the paint to dry then enjoy!
Isn't this just the funnest little craft?! If you wanted to turn it into a charm, you'll just add an eye hook and chain. I personally just love having the figure on my desk.
If you loved this as much as I do, be sure to pin it to your favorite craft board on pinterest so you can find it again fast when you're ready.
MORE FUN KIDS CRAFTS YOU'LL LOVE
- Weather Science Experiments for Kids
- Epic Fort for a Cozy Family Evening
- 50 Art Supplies from Your Trashcan
Polymer Clay Puppy Kids Craft
One of the cutest things you can make in less than an hour, this polymer clay puppy is the perfect kid DIY idea.
Materials
- White Polymer Clay
- Light Brown Polymer Clay
- Dark Brown Polymer Clay
- Pink Polymer Clay
- Black Polymer Clay
- White Acrylic Paint
- Pink Acrylic Paint
- Rubbing Alcohol
Tools
- Chopstick or ⅛-inch Dowel
- Oven
- Parchment Paper
- Baking Sheet
- Toothpick
- Paintbrush
Instructions
- Preheat your oven to the temperature noted on your clay packaging. For my clay the baking temperature is 230-degrees F.
- To make the body of the dog, break off a small portion (about 1 inch square) of the light brown clay.
- Roll this light brown clay into a nice, neat ball that is very smooth, then roll and shape the top (your choice of which end is the top) into a bit of a wide-domed cone. This should be as rounded and smooth as you can get it.
- Mash the other end of the light brown clay into a flat bottom.
- Make the tail by pinching off one small piece of the dark brown clay (about 1/4-inch long by 1/8-inch wide) then rolling it into a fat, short snake. Taper the snake on one end to a point and flatten the other end. Affix the flat end of the tail to the back bottom of the body piece of clay. To help the edge of the tail to affix to the body, you can use a paintbrush to work the edge of the tail into the body. Give the tail a little curl, as desired.
- Make the ears by pinching off two very small pieces of the dark brown clay (about ¼-inch long by ⅛-inch wide each). Flatten and shape each of these into small floppy ears and affix them to either side of the top of the body piece of clay. To help the edges affix, you can use a paintbrush to work the edge of the ears into the body.
- Make the muzzle by pinching off a piece of white clay (about 1/8-inch square) and shaping it into a wide, flat oval shape. Press it to the front of the body piece, about 1/3 of the way down from the top of the head.
- Make the nose by pinching off a piece of black clay (about 1/16-inch square) and make it into a nice, neat ball. Press this onto the front of the dog, at the top of the muzzle.
- Add eye sockets by pressing the end of a chopstick twice into the space between the nose and ear, leaving a shallow crater where the eyes will go.
- Add the eyes by pinching off the tiniest piece of black clay (about 1/16-inch square) and rolling it into a tight, neat ball. Repeat to make two balls, then press them into the craters you made in the last step.
- Finally, pinch off the tiniest piece of pink clay (about 1/16-inch square) and rolling it into a tight, neat ball. Then flatten it into a flat oval. Fold this in half and affix it to the bottom of the muzzle.
- Clean your fingerprints and tiny imperfections from your puppy dog by gently brushing the clay with a paintbrush dampened in rubbing alcohol. This does not have to be super wet with the alcohol, just a little goes a long way. Take care to brush the white parts first, followed by the darker colors so that no brown clay smears on your white clay.
- Bake the clay dog per the instructions on your clay packaging. Allow to cool completely before handling.
- Using the end of a toothpick, place the smallest dot of white paint on the black part of the eyes.
- With the clean end of the toothpick, place the smallest dots of black paint on the muzzle for faux whiskers.
- Allow the paint to dry then enjoy!


Leave a Reply